Streaming Learning Center Where Streaming Professionals Learn to Excel

While low-latency transcoding sounds desirable, low-latency transcode settings can reduce quality and may not noticeably …
Read More »
March 7, 2024
NAB Session on AI in Video Streaming
Like most encoding professionals, I’ve followed AI-related streaming advancements for the last few y…
February 28, 2024
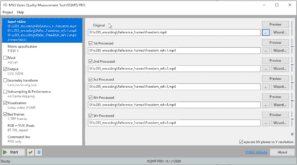
Common Errors Obscured by Automated Video Quality Assessment
This article discusses five common errors that can be obscured by automated video quality assessment…
October 30, 2023
Free “Must-Have” Applications for Video Engineers
Here are the free “must-have” apps I install on every Windows computer (and three for-fe…
September 27, 2023
Learn To: Use Capped CRF with SVT-AV1 for Live Streaming
Learn to use Capped CRF with SVT-AV1 and FFmpeg for live transcoding, including how capped CRF compa…
September 18, 2023
Best SVT-AV1 Bitrate Control Technique for Live Streaming
There are four bitrate control techniques worth considering for live encoding/transcoding using the …
Recent Posts


-

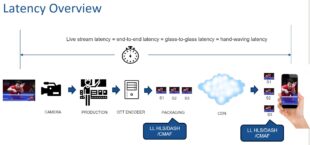
The Quality Cost of Low-Latency Transcoding
While low-latency transcoding sounds desirable, low-latency transcode settings can reduce quality and may not noticeably …
Read More » -
My FFmpeg-Related New Year’s Resolution: Document Before I Test
-
Which is the Best AWS CPU for FFmpeg?
-
Running FFmpeg on Windows Subsystem for Linux
-
Maximizing Quality and Throughput in FFmpeg Scaling

-
Free “Must-Have” Applications for Video Engineers
Here are the free “must-have” apps I install on every Windows computer (and three for-fee …
Read More » -
Streaming Media 101: “I was Amazed at How Much I Learned”
-
Build Your Own Live Streaming Cloud
-
Streaming Learning Center Goes Mobile
-
A Guide to VVC Deployment


-
Updated Lessons for Video Quality Metrics Course
We’ve updated several lessons in our Video Quality Metrics course, including some relating to the …
Read More » -
Free “Must-Have” Applications for Video Engineers
-
Additions and Updates to Video Quality Metrics Course
-
SVT-AV1 and Libaom Tune for PSNR by Default
-
Finding the Optimal Top Rung Data Rate